instalacion.
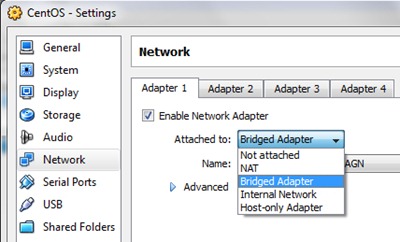
1. En primer lugar tenemos que hacer ajustes El networking en VirtualBox. Antes de sistema de arranque CentOS, Seleccionamos y hacer clic en el botón "Ajustes"En VirtualBox. Vamos a"Red"Y en la pestaña"adaptador 1"Seleccionar"adaptador de puente".
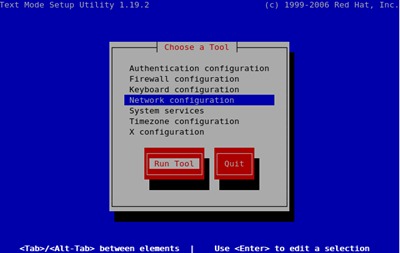
2. Empezamos el sistema operativo y abrir el terminal. comando de la presa "Configure"Así que ir a Configuración de la red.
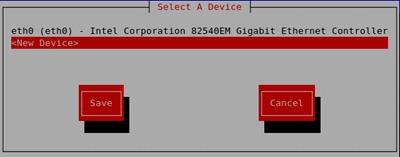
en "Configuración de la red"Abrir"Editar dispositivos".
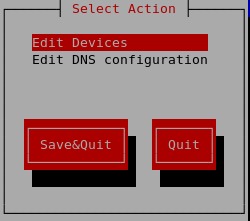
Normalmente, en la lista de dispositivos solo debe aparecer eth0.
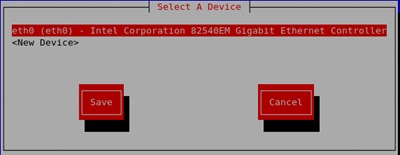
El uso de una conexión con RDS (ppp) Con una enrutador, la eth0 es mejor dejar la conexión a través de DHCP.
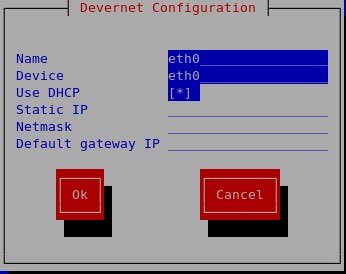
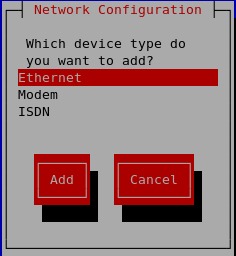
3. en "Configuración de la red">"Editar dispositivos"Seleccionar"nuevo dispositivo".
Ethernet & Agregar
4. En el nuevo dispositivo de establecer lo siguiente:
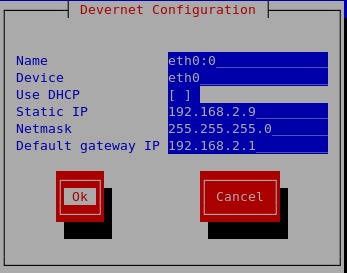
"IP estática"La propiedad intelectual es que nos conectamos a través de SSH servidor virtual. "Puerta de enlace predeterminada IP"Será IP del router (en nuestro caso. Puede ser diferente. ipconfog / todos in símbolo del sistema para ver quién es su ip)
Aceptar> Guardar> Guardar y Salir> Salir.
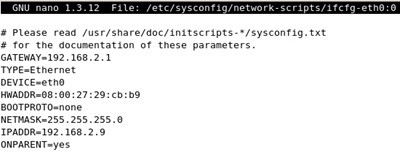
5. ir a / Etc / sysconfig / network-scripts / y editar el nuevo archivo: ifcfg-eth0: 0
Comando en el terminal:
nano / Etc / sysconfig / network-scripts / ifcfg-eth0: 0
In eth0: 0 una línea con sus ajustes para encontrar el punto 4 a la que se añade la línea:
ONPARENT = yes
Ctrl + X> Y & Enter para guardar los cambios.
6. reinicio de la red.
reinicio /etc/init.d/networkoservice network restart

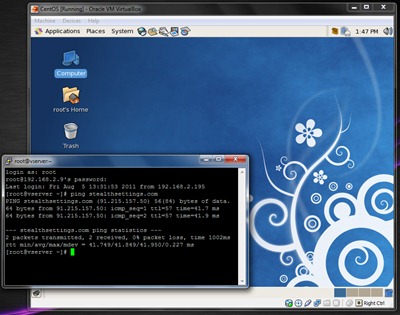
Después de recibir la confirmación de que todos los dispositivos de red funciona bien, vamos en nuestro sistema operativo (Windows XP, Vista o Windows 7) Y abierto PuTTY. A nombre de host (o dirección IP) Get Set IP 4 punto estático y la sesión abierta.
Ahora podemos administrar el servidor virtual desde cualquier ordenador LAN. Podemos utilizar servidor web, ftp server, Etc ..
}
1. First of all we have to make adjustments Networking in VirtualBox. Before CentOS boot system, we select and click on the "Settings" button in VirtualBox. Let's go to "Network" And in the "adapter 1" tab Select "bridge adapter".
bridge adapter
2. We start the operating system and open the terminal. command of the dam "Configure" So go to Network Configuration.
Network settings
in "Network settings" Open "Edit devices".
Edit devices
Normally, only eth0 should appear in the device list.
eto - DHCP
Using a connection with RDS (ppp) With a router, eth0 is better to leave the connection through DHCP.
use DHPC
3. in "Network configuration"> "Edit devices" Select "new device".
new device
Ethernet & Add
Ethernet
4. On the new device set the following:
Eth0 settings
"Static IP" The intellectual property is that we connect through SSH virtual server. "Default IP Gateway" It will be the router's IP (in our case. It may be different. Ipconfog / all in command prompt to see who is your ip)
Accept> Save> Save and Exit> Exit.
5. Go to / Etc / sysconfig / network-scripts / and edit the new file: ifcfg-eth0: 0
Command in the terminal:
nano / Etc / sysconfig / network-scripts / ifcfg-eth0: 0
In eth0: 0 a line with its settings to find the point 4 to which the line is added:
ONPARENT = yes
ifcfg
Ctrl + X> Y & Enter to save the changes.
6. network restart.
restart /etc/init.d/network
or
service network restart
centos network restart
After receiving confirmation that all network devices work fine, we go on our operating system (Windows XP, Vista or Windows 7) and open PuTTY. A hostname (or IP address) Get Set IP 4 static point and session open.
CentOS VirtualBox putty
Now we can manage the virtual server from any LAN computer. We can use web server, ftp server, etc.
VIDEOTUTORIAL.

No hay comentarios.:
Publicar un comentario